As an artist myself at the beginning, I was furious about AI tools and couldn’t believe that this was happening, then that anger turned into fear of it taking our jobs and how the future looks for artists, and then… well the “deal with it” phase kicked in.
AI isn’t only about art, AI is everywhere from coding to writing to voice… it’s affecting all industries not just ours, and the technology is so big that we only have 2 choices, stand against it until it swallows us, or drum rolls… LEARN about it so it’s no longer that monster that we are afraid of.
That being said, nowadays we are at a stage where AI is used in the biggest studios from film to games, some studio even are developing their own AI tools and incorporating it into their workflow and even the people who hated AI and fought against it are now using it as part of their workflow.
Want to know who wins Midjourney or Leonardo AI? Check out this article.
AI in Professional Art workflows
I get this question a lot, How are you using AI in your professional workflow?
there are currently many ways to use AI in any professional Art workflow whether it’s for games or films and as AI continues to progress and more tools are added and it’s capable of doing things it will get integrated more in the art pipeline.
Some of the use cases AI is used nowadays:
- Creating Moodboards: Finding an Art style is one of the most crucial bits in an art workflow and the way we used to do that in the past is by researching Pinterest mostly gathering images and building a moodboard using Puref, but nowadays we can use AI to generate references in the exact style we want and we have in mind!
- Creating Backgrounds: In games, there will be lots of instances you want to create a background for your runner game or a background for a splash screen, instead of putting 2 days of work into that you can use AI to generate one for you, and with a bit of tweaking could be done in half a day!
- Creating Props: Sometimes in the creative process you run out of ideas for props and certain ornaments you can place in your design, AI can be very useful in that it will give you ideas and generate these small graphics that you can tweak and easily incorporate in your work.
- Testing Styles Quickly: Normally this can take a lot of time, say you are creating a game character and after finishing it your art director says hmmm I wonder how this character looks in a semi-realistic style, well you can easily do that now with AI and experiment with different styles quite quickly.
Of course, there are more uses but so far all of these require a bit of work after generating the AI artwork and it’s not just copy and paste, still an artist needs to polish tweak, and fix whatever the AI produces.
Why Leonardo AI?
I have tried a bunch of AI software now, both commercially available and others that are studio-built and if you know how to work with one the same concept goes for others with slight changes in how you do that.
Until Leonardo AI came out, the people who created that software are GENIUS! why? well because all these software are ART software so? any artist needs a proper interface to work with that’s how our brains work we need a UI with buttons and sliders we can’t have a chat room as software (hinting to Midjourney) and it can’t be too tech-complex as we won’t even know how to operate it!
When I first tried Leonardo AI, I was so pleased someone created an AI art tool that artists could actually use and understand, things were laid out logically and it was a tool I would invest my time and energy into learning.
Leonardo AI Free and Paid Subscriptions
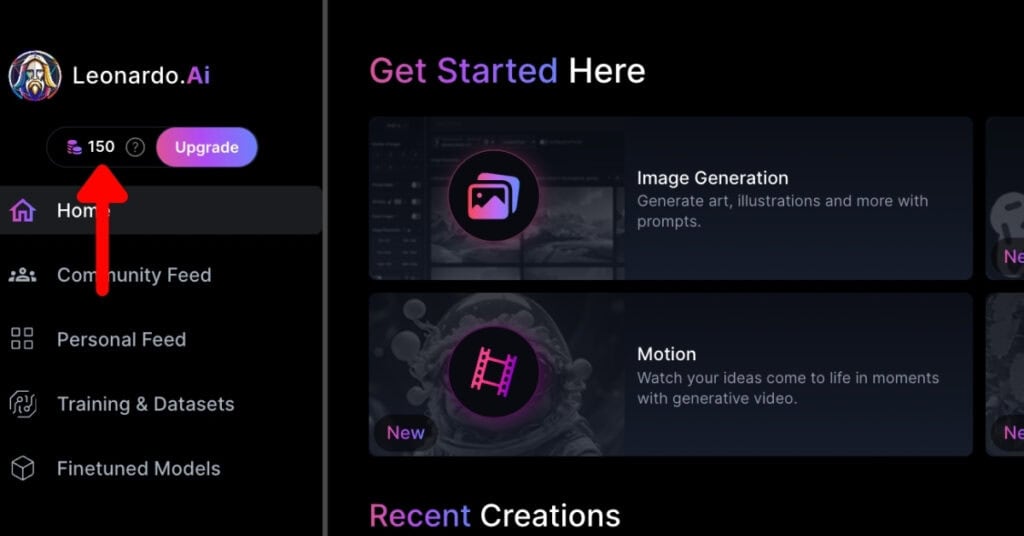
Needless to say with such a cool UI interface and great capabilities Leonardo AI comes with several subscription plans to suit all needs, but I do appreciate that they kept the door open to Free usage, anyone can sign up and have 150 Tokens per day (each image you generate is about 5 Tokens) to use and experiment with Leonardo AI.
That being said if you need more and if you start using Leonardo AI in your professional workflow that means this tool is generating income for you and makes sense to invest in other paid plans.

Free plan: You will get 150 Tokens per day only and your creation won’t be private so everyone in the community can actually see what you have made.
Apprentice Standard: You get 8500 Tokens per month and you will get the Private mode in this one and also 5 pending jobs (meaning you don’t have to wait until the first job is done to start another one) it costs 10 $ per month If you pay yearly and 12 $ if you pay monthly.
Artisan Unlimited (Recommended): You get Unlimited Generations, of course, Private mode, and up to 25 pending jobs so this is like a really good if you are using AI in your daily workflow. The Artisan Unlimited costs 24 $ per month when billed yearly and 30 $ when paid monthly.
Maestro Unlimited: I think with this one Video would be the most prominent feature of course in addition to all that you get in the Artisan Plan. This is the most expensive plan at 48 $ per month if billed yearly and 60 $ if it’s a monthly payment.
The subscriptions are not crazy expensive like other AI tools, in fact, if you work extensively on it then the Artisan Unlimited works perfectly for you, you have unlimited image generation, the only downside is that Video is not included in this.
but anyway for today’s Guide, we will go over the Free version and use our 150 free daily tokens so everyone can follow along.
So without further or do, let’s get started with Leonardo AI.
Getting Started With Leonardo AI
Creating An Account on Leonardo AI
Step 1: go over to Leonardo AI website -> Here
and click on Sign up.

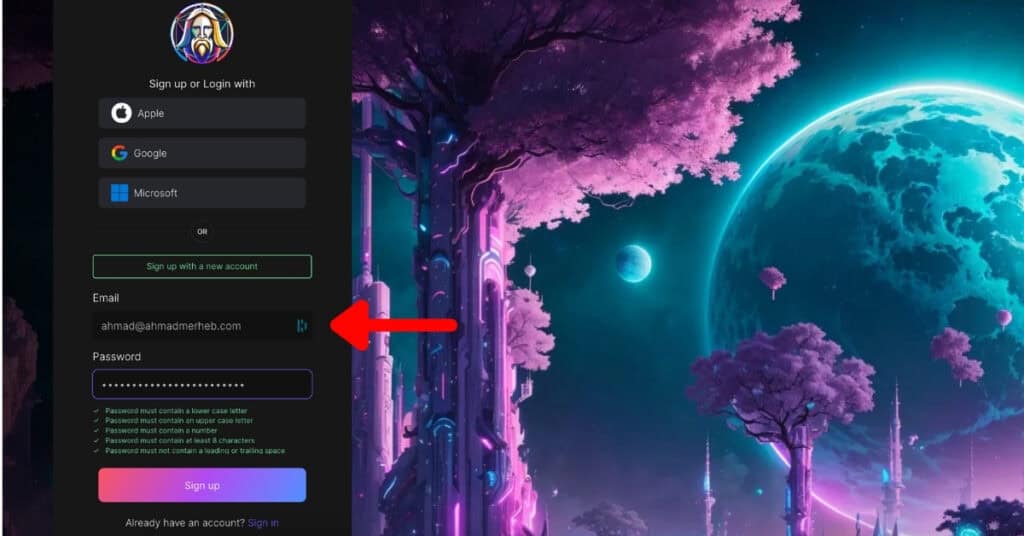
Step 2: Fill in your Email Address and Password and click Sign up.
Step 4: a verification code will be sent to your email, go ahead and past it in the verification code box and press Confirm Account.

Step 5: Choose the username you would like to use, and your interests, and tick the above 18 checkbox, and hit Next.

your DONE! you now have a Leonardo AI account congrats!

Leonardo AI Interface
As soon as you logged in to Leonardo AI you will have these basic sections
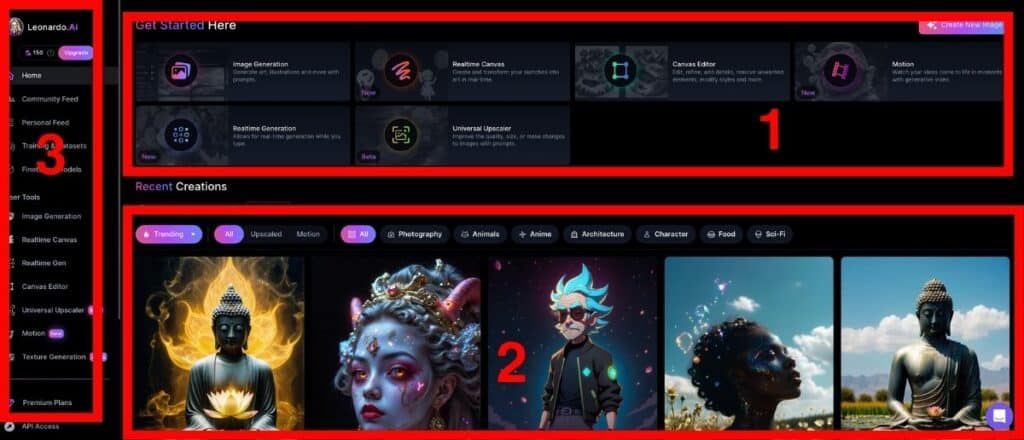
- Section 1: is the features section where you can quickly access some of the popular and useful features of Leonardo AI
- Section 2: Community feed is what other people using Leonardo AI have created and you can click on any of them and see the prompt they used and even generate images in the same style.
- Section 3: Main Menu, this is where you can switch between the major tools that Leonardo provides and also adjust your settings, and even logout if you need to.
Generate Your First AI Image
Let’s start with the process of generating our first AI image, and to do that there are several ways but I will show you the easiest and most reliable way of doing it.
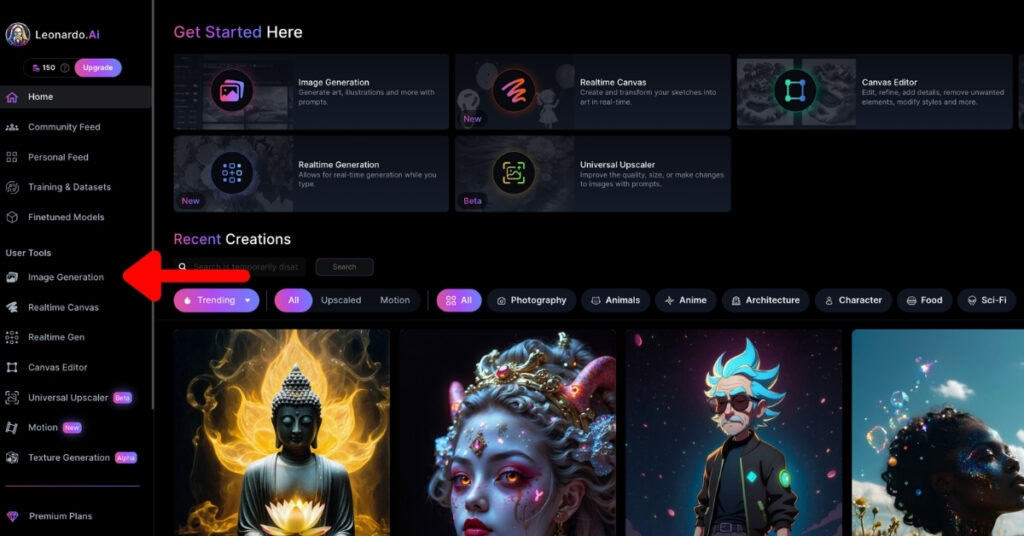
Step1: Click on Image Generation from the left side Menu

You will be taken to a new window where all the image generation will happen, don’t worry if it looks overwhelming I will teach you about all of the buttons and sliders you need.
When generating an image we should keep in mind a couple of things:
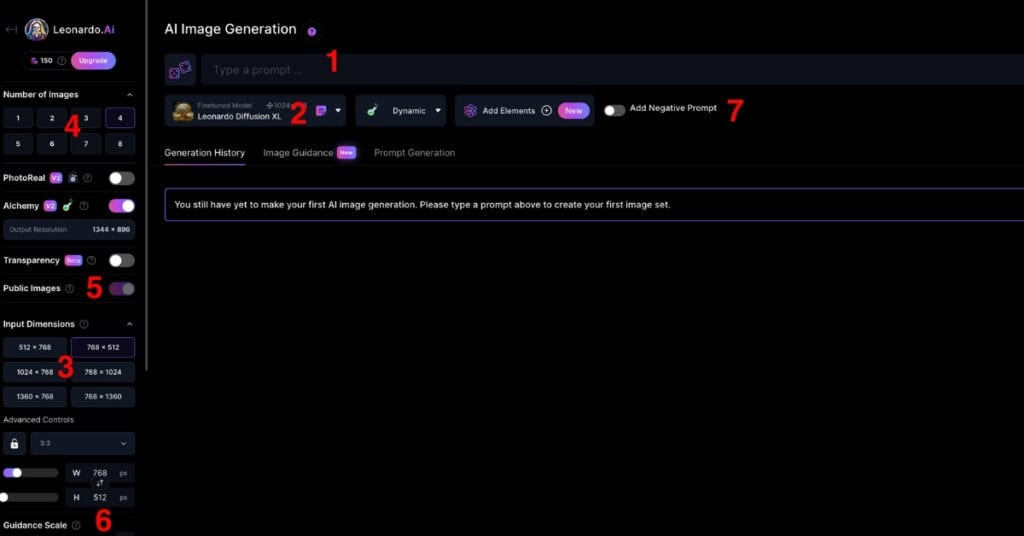
- 1. Prompt: This is the text description you will input to describe what you want to create.
- 2. Model: In which model will the image be generated, by default it’s Leanardo Diffusion XL but you can change that and experiment with others.
- 3. Image size: this is how big our image needs to be whether it’s 1024 by 1024 or a 4k image etc…
- 4. Number of Images: this is how many images we want to generate and this will take up from our tokens so we need to be careful not to put too many images.
- 5. Private or Public: as mentioned before if we don’t have a Higher plan then this option will always be public and everything you create will be seen by the community.
- 6. Guidance Scale: this is how much Leonardo’s AI will follow your prompt the higher it is the more strict it will follow and the lower the more freedom you give the AI to be creative.
- 7. Negative Prompt: This is where you define to Leanardo AI what you don’t want to have in the image if you have a specific thing in mind.
Step 3: in the Prompt Section Write something you want to generate for me I will write “Samurai Cat” and click on Generate.
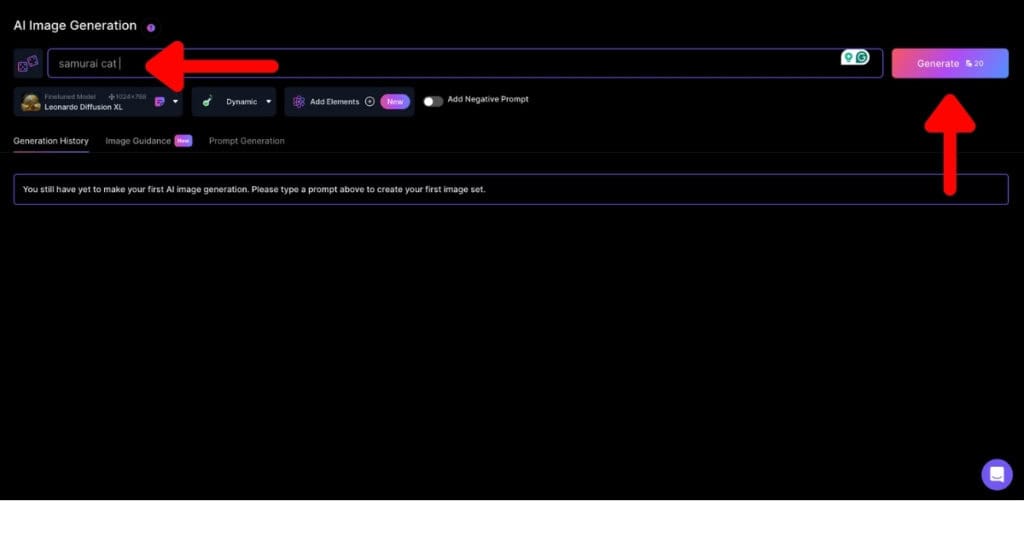

There you go it generates 4 images of a Samurai Cat! That was 20 Tokens so that’s 5 tokens per image spent.
Step 4: hover over the image you like the most and you will see a bunch of options appear click on the download one and you will have that image downloaded!


And that’s it congrats, you generated your first AI Image!
Prompt Generator in Leonardo AI
Creating a prompt isn’t an easy task, in fact, one word or one comma can really have a drastic impact on the image generated, you need to be really careful how you craft your prompt and this you will learn with time as you generate more and more images.
In Leonardo AI there is a feature called Prompt Generator, which is mainly there to help you when you don’t have ideas or when you need help creating a good prompt.
In the Free plan you will get 100 Prompt Generations, let me show you how to use it, it’s very cool.
Step 1: Click on Prompt Generation

Step 2: Choose how many Prompts you want to generate

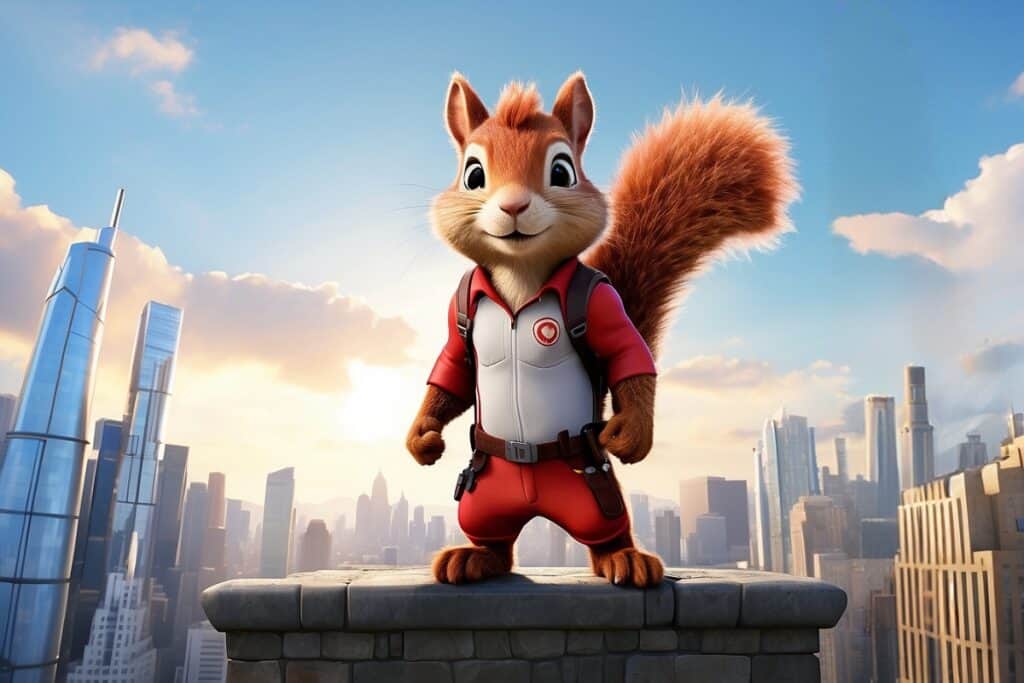
Step 3: Type in your main keywords that you have in mind for example: skyscraper, squirrel, hero and Click Ideate.

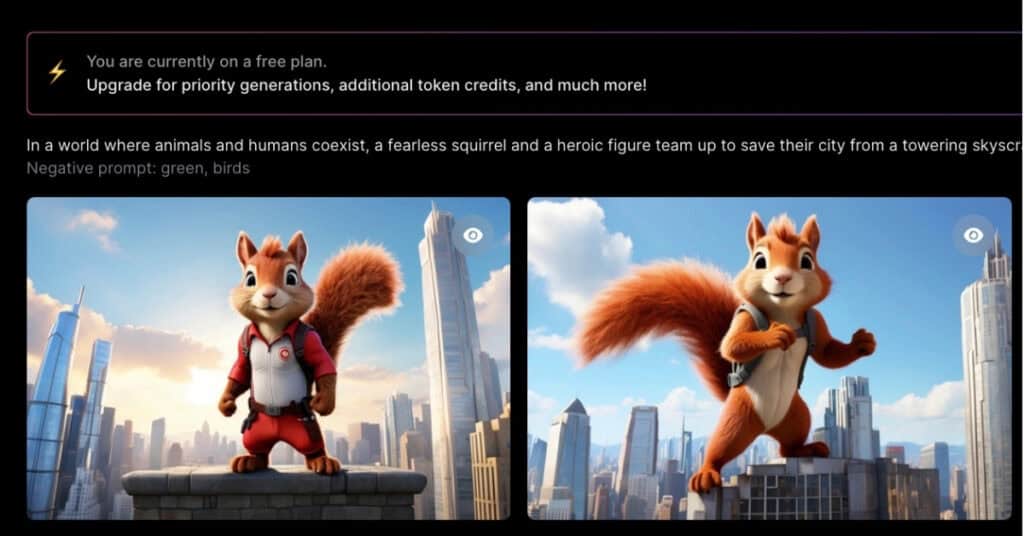
and there is it Leonardo just gave us 4 ideas using the keywords we supplied it with, and at any point, you can click on the Generate button on the right side of any of those ideas to create an image based on the Prompt.
You can also click on the arrow next to the Generate button to edit the prompt in case you want to add some specific style
I liked the last Prompt and here are the results!
Prompt: In a world where animals and humans coexist, a fearless squirrel and a heroic figure team up to save their city from a towering skyscraper that threatens to destroy it. Together, they use their unique abilities to take down the building and restore peace to their home.

Removing Defects from AI Generated Images
Sometimes when generating an image you will get a certain defect, it could be something that doesn’t make sense in the image or a wrong object placed in a wrong location, instead of adjusting your prompt and regenerating again which will consume more of your Tokens!
There is a tool that helps with changing only one part of the image which is very handy in dealing with defects in AI generated images and that tool is “Negative Prompts“.
Step 1: Toggle the Add Negative Prompt, as soon as you do a new text box appears and that’s where you can add what you don’t want to see in the generated image.

Step 2: I added “Green, Birds” meaning I don’t want to see these in the next images I generate and press Enter
and there you have it, all green leaves have been removed, and all the birds that were in the sky! I like the first one so I will download it!

Of course, you can go ahead and Upscale that image to have a more polished version of it before calling it done, if you want to learn more about Upscaling in Leonardo AI check out this article.
Remove Background In Leonardo Ai
This is a recently added feature in Leonardo AI, it’s a very handy way to remove any background from the image you generate, now that being said it works really well when the background is blurred or if you are doing some logos or graphic work.
Let’s go ahead and test it with the Hero Squirrel we did.
Step 1: Hover over the image you want and Click on the Remove background button. (this will cost 2 Tokens just for you to keep in mind)

Step 2: Once it finished working Click on the same button again to view the picture without the background and that’s it, pretty simple.

As you can see it did a very good job separating the Hero Squirrel from the background even though it’s all fur, so you can see how powerful this tool can be.
Using Images in Leonardo AI
One of the most asked features in Generative AI is the ability to feed AI your own images and references so that it can produce a close result to what you want, and in Leonardo, it’s very simple and intuitive.
First, let’s go ahead and find an image, for now, I am going to use one of my own 3D Sculpts as a reference, it’s this one.
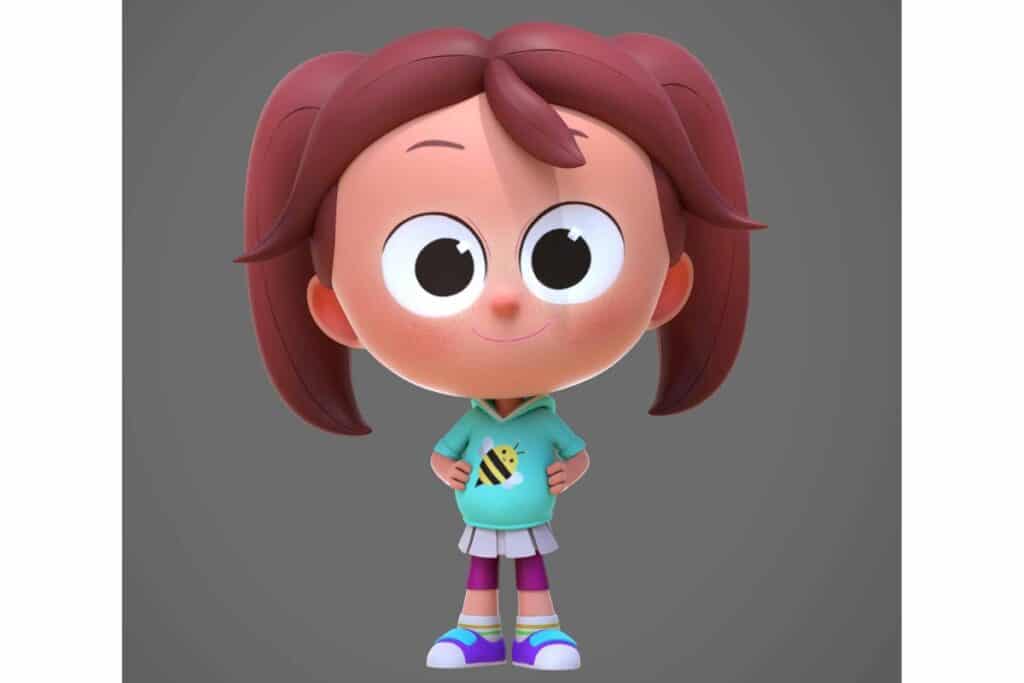
Step 1: Click on the Image Guidance Tab to go to the section where you can insert your images.

Step 2: Drag and drop the image you want to use as a guide for the AI.

Step 3: Adjust the Strength of the image, the more you increase the closer the result will be to the reference you added, and Click Generate again. (be careful increasing this slider to above 0.6 will result in a duplicate result of the image you inserted so always keep the strength value low).

As you can see even with the Strength set to 0.3 we are getting a very similar style to the reference we provided it, its still a squirrel but closer to the style we wanted.
From my experience using the strength values between 0.2 and 0.3 is good if you want to use the image as a reference anything above would start using the reference as a blueprint and anything less wouldn’t influence the image much.
Besides this Image to Image operation, Leonardo has other types but all of them are premium at the moment but worth mentioning:
- Image to Image (the one tried above): Uses all elements in the image you provided to influence the newly image generated, so if the strength is set to 1 then you will get 100% the image you provided it with.
- Depth to Image: This one uses the depth of the reference image provided as a guide for the new image that will be created.
- Edge to Image: Basically scans the reference image provided searches how edges are treated and tries to mimic that in the newly created image.
- Pose to Image: This is very useful, in case you want to pose a character and you find a good pose as a reference image you can upload the image and use this feature to only take the pose from the reference image.
- Text Image Input: The image here needs to have White Text on a Black background and this will guide how the image will be generated.
Add Elements Feature
The add elements feature was recently added to the Leonardo AI toolkit, when I first read the name I imagined I could add actual elements in the image like for example adding a chair or an animal, but that’s not what this feature does.
This feature allows you to add a certain style that the generated image will adhere to its sort of when you add an image and then Leonardo tries to follow the image you uploaded but with this feature, it’s a bit more in terms of style rather than 100% 1 to 1 copy.
Okay so let’s test this feature together and see what kind of results we would get.
Step 1: Click on the Add Elements button.

Step 2: a new pop-up window will appear, where you can see the different styles you can choose from, you have the freedom to pick up to 4 styles! For this one, I will 3D Sculpt and click Confirm.

Step 3: then notice how this new box appears where you can see what Elements (style) you chose and also a weight slider you can adjust, for now, I will leave it as is and hit Generate.
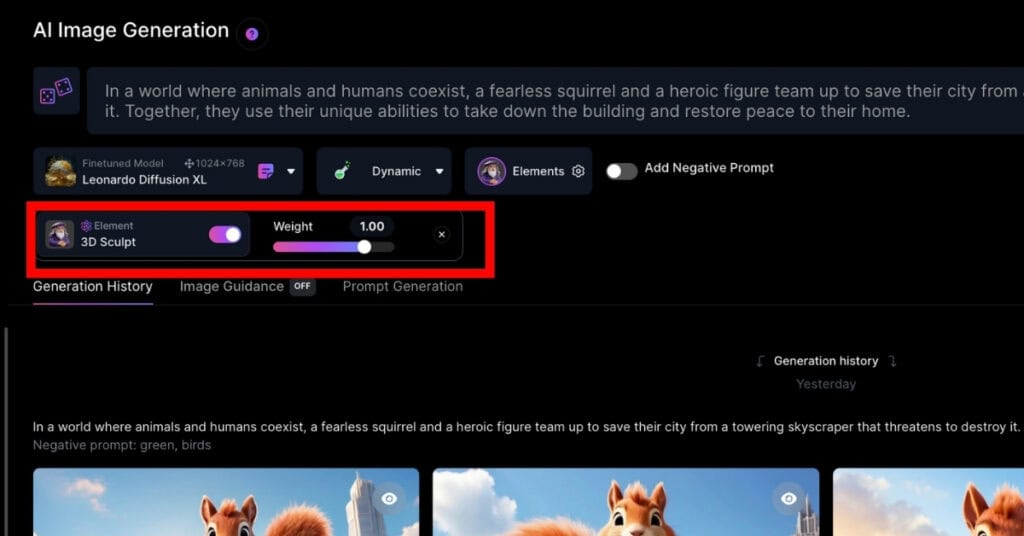
Step 4: and there it is, the style changed to more Cartoonish as you can see!


FineTuned Models in Leonardo AI
So far in this guide, all the images we generated are using one single model which is the Leonardo Diffusion XL and it has been giving us great results, but there are lots of more models we can test and try and some of them are really exciting.
To check out what models you can have head over to the Finetuned Models page in the left-side menu and Click on it.

There you will find so many models you can use, you can use the one that Leonardo AI provides “Platform Models” or the ones that the community created “Community Models”.
When you click a certain model a new popup will show with a description of the model and you can expect if you were to use it and also some examples of what people got as a result of using it.

I have a crazy idea! I want to see how that Hero squirrel we have been working with will look in the Pixel Art Finetuned Model.
Step 1: Go back to Image generation by clicking on the left-side menu.

Step 2: We are back now to where we were, click on the Fintuned Model drop-down menu and choose Select Other Model.
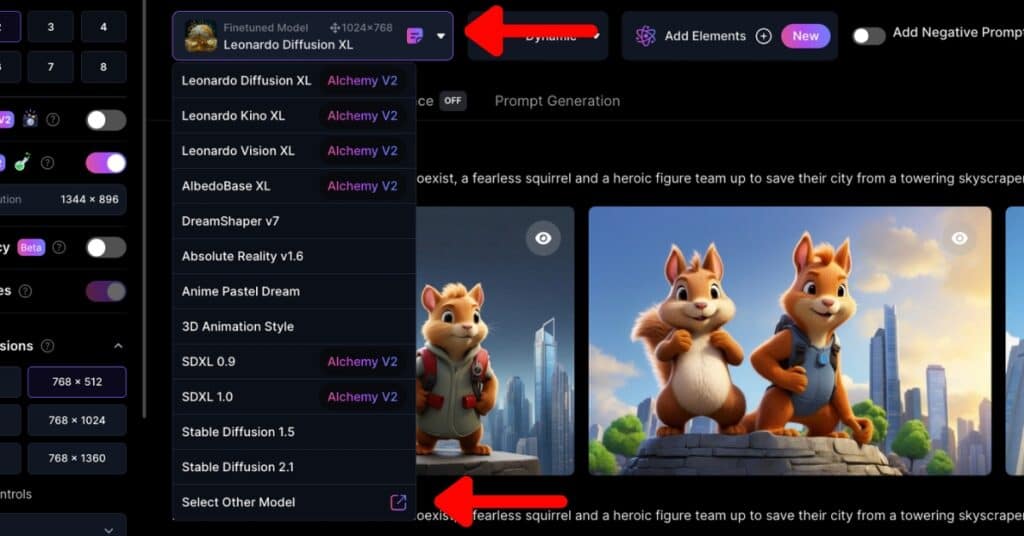
Step 3: a new pop-up will show, choose the Pixel Art Model.

Step 4: Click on Generate with this Model.

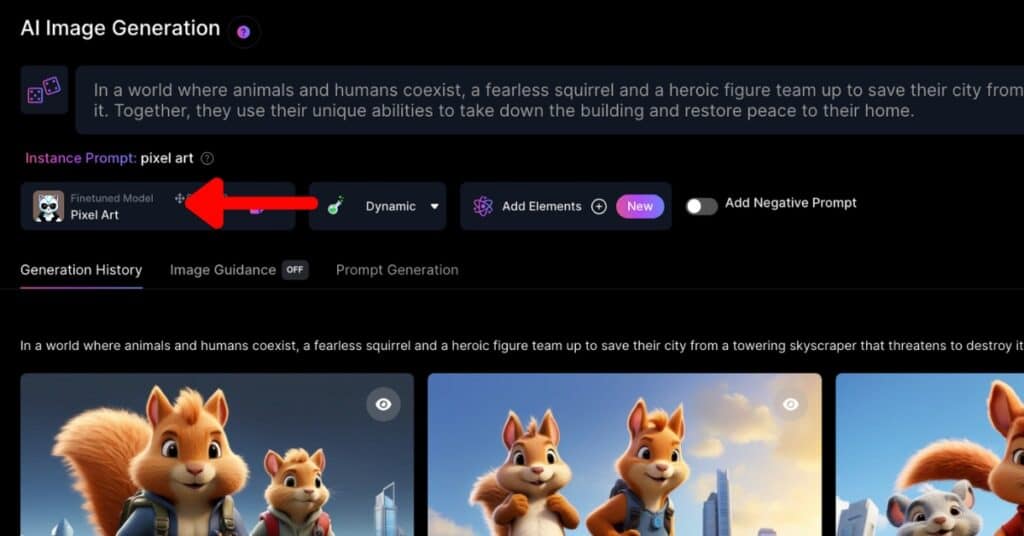
Step 5: As you can see now the Finetuned Model has changed to Pixel Art and we can click Generate.
Alright Below are some of the tests I got with Different FineTuned Models, just a note the models don’t deliver great results while others do so it’s a matter of testing until you get what you want.
Pixel Art Finetuned Model

Cute Animal Characters Finetuned Model

Leonardo Diffusion Finetuned Model

Pixar/Disney (Community Model)

Remember you can always use the Fixed Seed Feature if you end up liking one of the image generations you had to generate more of the same style.
Animate Your AI Images
Leonardo AI recently added the Motion feature, which as it implies means you can add animation to your generated images! and it’s pretty straight forward actually.
Let me show you how we can take one of our Hero Squirrel AI-generated image and add motion to it.
Step 1: Click on Motion from the left side menu.

Step 2: Click on Select an Image.

Step 3: a popup will appear and here you can choose an already generated image, I will go with the Heroic Squirrel pose and click Confirm.

Step 4: Adjust the Motion Strength slider if needed, but for now I will go with the default value that it has and hit Generate. (it will cost 25 Tokens)

Step 4: Another window will pop up stating that it’s currently generating, click on View Generation to go to the location.

and that’s it you have your Generated MP4 Video!
P.S: Since this is a new feature of Leonardo AI, do not expect SORA AI results here, but it will keep on improving with time.
Advanced Techniques in Leonardo AI
Alchemy Feature
A new feature introduced recently by Leonardo AI, the Alchemy Feature, in a nutshell, this feature will enhance your images and your prompts so you get better results, it does several things in the background for you I will name a few.
- Resolution bump between 1.5x to 2x increase making your images sharper.
- Contrast increase, which helps your image to grab attention, and don’t worry if the image is already dark as it will make sure to fix the contrast based on each specific case.
- Resonance is basically adding details to your images, the bigger this value is the more detailed the image will be so be careful extra details are not always something you want. (I would advise not going above 15)
Something to keep in mind is that when using the Alchemy feature the amount of tokens you spend per image generated increases from 4 to 12 tokens per image.
To activate the Alchemy feature all you have to do is turn it on from the left-side menu in the Image Generation window.
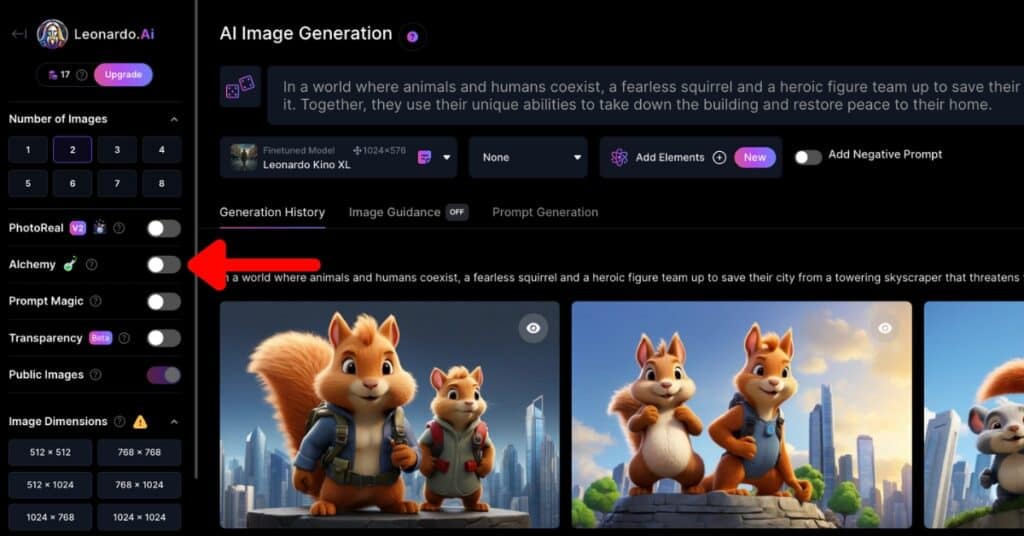
As soon as you turn it on you will some changes in your settings, as this tool is basically finetuning whatever setting you have for better results.
With the Alchemy feature turned on you will notice a new drop-down menu appears right next to the Fintuned Models menu, which is the style you can try to get different types of images!

AI Canvas in Leonardo AI
This is one of my favorite tools in Leonardo, this is where you get to fix certain areas in your generated image, giving you maximum control over what the final image would be. let’s jump right in.
Step 1: in the Image generation section hover over one of the images you would like to edit and click on “Edit in Canvas“.

Step 2: New window will open and then you will be in the Canvas section.

So what I want to do next is remove that skyscraper on the right of the squirrel.
Step 1: Click on the top right where it says Infinite Mode.

Step 2: Notice the window changes now with more buttons, and now we see a box on top of our image that we can click and drag around! That box limits whatever changes we make to that area alone!
Now what we want to do first is drag the box to where the Skyscraper is, if the box dimensions don’t cover use another dimension from the right side.

Step 3: Select the Eraser tool from the left tool pane and paint on the skyscraper we want to remove (make sure to cover it entirely).

Step 4: now we need to click on the button next to the Prompt which will open a window for the Negative Prompt and type “No Skyscraper” and then in the Prompt write the word Simple and then press Generate.

Step 5: Okay so Leonardo gave us 4 options to choose from, you can click on the Arrow to go through them pick whatever you see fit, and then press Accept.

Alright, I picked the best one as it was the cleanest, and here is the final result! pretty neat!
Prompt Magic
Prompt Magic is a new feature to help us have more control over how the prompt will influence the generated images.
Basically, it’s telling Leonardo AI to use more of the words we put in our prompts and when you activate this feature you will have a slider that you can control the strength of this feature.
You find the Prompt Magic toggle in the left side menu right under the Alchemy one and you only need to toggle it on.

Then to actually control its strength you need to click on the box that shows under it, which will open a window where you can change the settings as you please, and don’t forget to click Save.
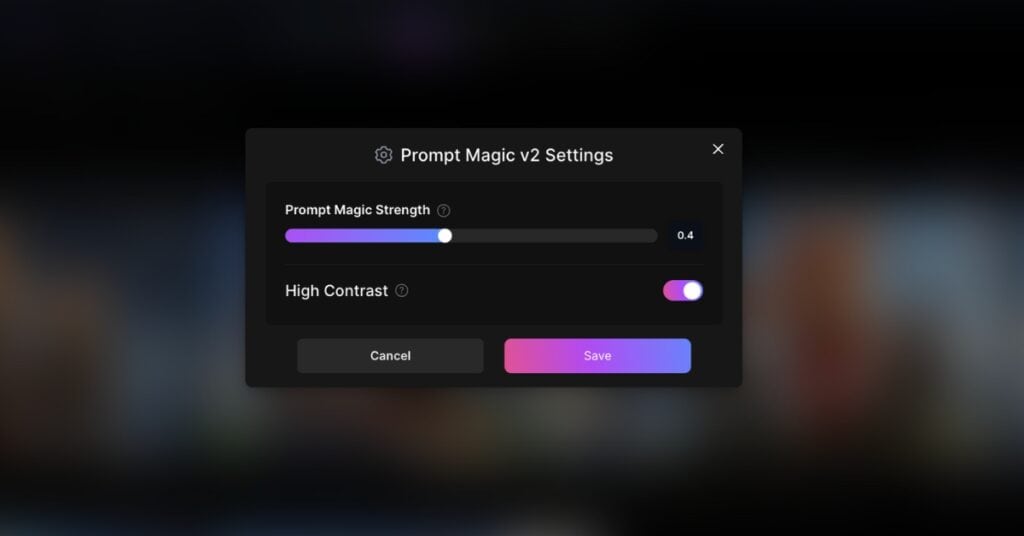
That being said be careful not to put this feature at maximum strength as it is always good to experiment giving some creative freedom for the generation bit.
Create Your Own AI Model
So far we have been using the already provided Fintuned Models provided in Leonardo AI, but what if you had a certain art style that you want to make a specific model based on it?
this is very important for artists that already have a portfolio of work or maybe in a game production and they came up with a style and would like to teach Leonardo AI about that style so they can start generating more art that adheres to that style.
Let’s jump in and start creating our own AI Model!
Before we start creating our own model we should keep the following in mind and prepare some files:
- At least 10 Images of the style we want to go for, this is to give Leonardo AI enough images to understand our style and have better results.
- Images we provide need to be consistent in terms of style so that Leonardo AI doesn’t get confused about the style we want to have.
Step 1: click on the Training & Datasets from the left side window, and then click on Create New Dataset.

Step 2: a new window pops out and we have to fill in the Name and Description of our new model, then click Create Dataset.

Step 3: now we need to add all our images, we either drag and drop them or click on Click Here.

Step 4: After adding all images click on Train Model.

Step 4: Now, we have another window, here we need to fill in the Model Name, the resolution (I will leave this as is), the Category (I will go for characters), the Description, the Base Model (leave it as is at Stabel Diffusion 1.5) and for the Instance Prompt this is to help people using your model with a starter prompt. Click Start Training when you finished filling all fields.

Step 5: Finally the training starts! and you can click on View Job Status to see if it’s finished, plus they will send you an email when it’s complete.


Step 6: and it’s done! you will receive an email notification about this, then what you need to do is head over to Image Generation, Click on Finetuned Models, and select Others Model. A new window will show as we have seen in the past, choose Your Models and then View.
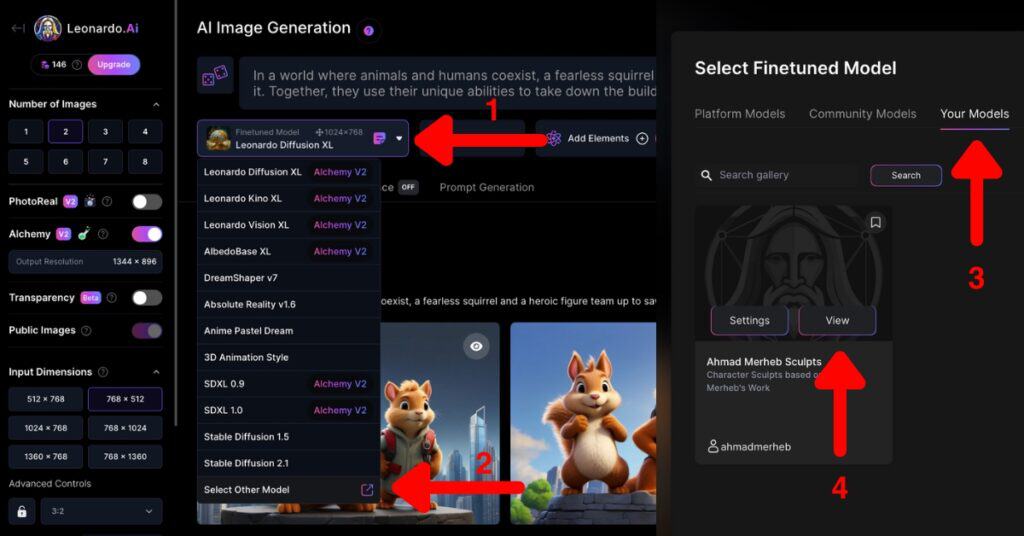
Step 7: Now click on Generate with this Model.

Step 8: Alright now let’s test out our Model! I will write this Prompt.
Prompt: 3D sculpt, Pixar, Disney, of a cartoon Mouse happy and jumping of joy!

And here is the winner!

Conclusion
Alright, you made it! you actually read a full guide about AI software, relax, and take a deep breath, hopefully, this guide gave you a deeper understanding of how AI works and how Leonardo AI made lots of the processes easier and more intuitive.
Leonardo AI will keep adding more features and AI will keep getting better and better, I hope you can incorporate some of the skills I taught you today in your professional workflow, making you much faster and more creative.
Remember to use AI as a tool to help you progress and make your life easier, and always work on the artwork that it produces and add your own style and touch to it by exercising your art skills and what makes you special as an artist.